Fresh Leaf Indigo Dyeing

I have quite a variety of natural dye plants growing in my Brooklyn tree guard planters, so only a portion of the space was reserved for indigo growing, resulting in a few indigo plants altogether.

A Brooklyn Tree Guard planter with many dye plants including hollyhock, coreopsis, black eyed susan, purple basil and indigo.
With such a small amount of indigo to work with, fresh leaf dyeing is the perfect technique to easily reap the blue rewards from my few precious plants. The resulting colors range from a light sky blue to sea foam aquas and jades. Fresh leaf dyeing has the advantage of no required additives or auxiliaries as well as the benefit of not requiring reduction (a process in vat indigo dyeing where the oxygen is ‘reduced’ from the dye bath making the indigo soluble and accessible, allowing the blue pigment to bind to fiber through oxidation- exposure to oxygen once removed from the vat). Fresh leaf dyeing skips this whole process and allows the dyer (if working quickly!) to directly dye fiber. The simplicity of fresh leaf indigo dyeing makes this method highly recommended for ease of process and smaller quantities of indigo plant matter.
For this tutorial, I have decided to breathe new life into a loved yet small staple of my wardrobe that has recently fallen victim to a few stubborn coffee stains: my favorite wool tank top.

My wool tank top and those stubborn coffee stains
I scored this vintage, lightweight, 100% wool tank top at a thrift shop in upstate New York last year and have worn it through all four seasons continually. Wool really is amazing, and at the right weight, a garment made from wool can be the perfect temperature regulating, all season piece. Fresh leaf indigo dyeing is best done with animal fibers (particularly silk as you will see). Cotton and other plant ‘cellulose’ fibers won’t absorb the color as readily.
First I hydrated the wool top with water and let it soak for a few hours to make sure it was thoroughly wet. While it was soaking I gathered my tools to have everything ready for the dyeing and harvested my indigo leaves.

All the necessary tools and my top soaking in water before dyeing.
It’s important to work quickly from harvest of the indigo to the dyeing as the leaves really must be quite fresh. No picking one day and waiting till the next to dye. Try not to let too much time pass between picking indigo and introducing the leaves to ice cold water (see more details about why and other factors that will improve your fresh indigo dyeing results in another blog post here).
Then I went outside and cut the leafy indigo stalks from one of my plants. This process will work with most indigo- bearing plant varieties (japanese indigo -or- ‘persicaria tinctoria’, woad -or- ‘isatis tinctoria’, and will often give blues & greens with fresh tropical indigo varieties of the ‘Indigofera’ family of plants). Try to harvest your leaves before the plant has flowered for the most indigo content possible. As you can see here in this instance, I am harvesting after the plant has started to flower- which will still give blues and greens, but at this point the plant is now putting less energy into leaf making (and thus blue precursor chemical) and is focusing energy into flower making.

My japanese indigo plants right before harvesting.
The leaves and not the stalks hold the vast majority of the color potential so they must be separated from the stalks before dyeing.

The leaves after separating them from the stalks.
After picking all the leaves from the stalks I placed them in a blender half full with very cold water. I emptied a full ice cube tray into the blender and let it melt, adding a bit more cold water after most had melted.

The indigo leaves in the blender with very cold water
Before starting to blend I only added half of the indigo leaves and set the blender on low for 1 minute, and then added the rest of the indigo leaves as it blended making sure that the blender did not overflow.

The indigo “smoothie” after blending well for 1minute with ice cold water and adding the remainder of the leaves.
Then I quickly strained the indigo leaves out and set them aside to use for a reduced indigo process later.

Strained indigo leaf bits are saved to use for a later dye process after the fresh leaf dyeing
With the solution strained and free of leafy bits, I added the wet wool top and stirred it in the fresh indigo dye bath continually for 5 minutes to ensure that the color would be as even as possible.
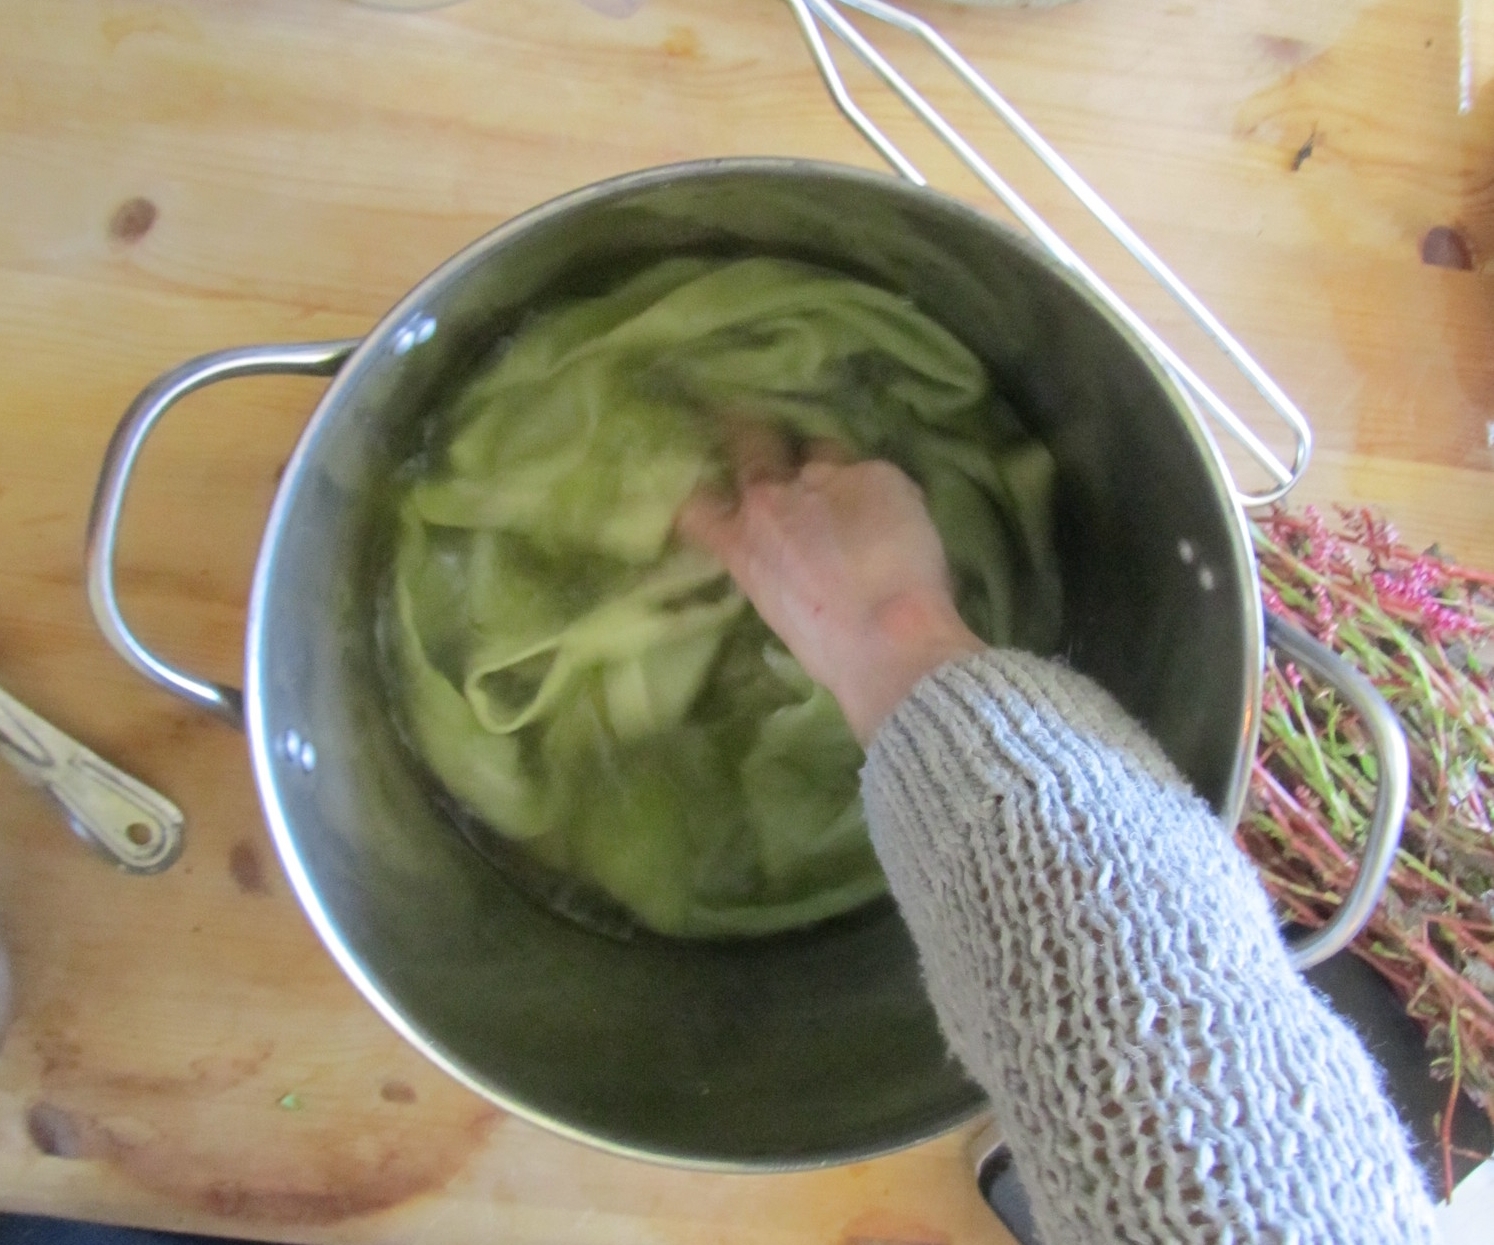
Stirring the top in the strained indigo water solution for 5 minutes minimum. Items can stay in the dyebath for up to 20 minutes.
Then came the magical moment when I pulled the top from the fresh leaf bath and exposed it to oxygen. This is when the color turns from yellowish bright green to anywhere from jade to aqua, to robins egg blue right before your eyes. I rinsed the top in cool water and hung it to dry.

The finished result of the vintage wool top (right) and another silk top I dyed with the fresh indigo leaves. The aqua blue pieces of fabric in the middle are raw silk and habotai silk.
And there you have it, fresh leaf indigo dyeing really is that easy! I’m excited to transition this favorite garment of mine renewed into a new season with the aid of my own locally grown natural dye plants.